Eventleaf event management software offers a reliable solution for checking in and out attendees, even in locations with no or limited internet connectivity. With the Eventleaf event check-in app's offline mode, you can easily manage attendee data by caching it on your device, ensuring smooth registration regardless of internet access. Once you're back online, the app automatically syncs with the Eventleaf cloud, keeping everything up-to-date.
Our event management platform ensures your check-in process runs efficiently, no matter where your event is held. Follow the simple steps to enable offline mode and keep your event on track, even when you're in remote areas with patchy internet service.
Step-by-Step Instructions
This guide provides step-by-step instructions on how to use Eventleaf's Offline Mode for checking in and out attendees at events, especially in locations with limited or no internet connectivity.
-
1. Prerequisites
-
Eventleaf Check In app installed on a compatible device. Make sure you have the latest version (4.0.2).
-
Event setup completed with attendee registration data available in Eventleaf.
-
The Check In App must be connected to the internet when enabling the offline mode.
-
-
2. Enabling Offline Mode
-
Open the Eventleaf Check In app on your device and sign in.
-
Select the event for which you want to activate offline check in.

-
Navigate to the 'Settings' section within the app.

-
In the Settings menu, select 'Usage Mode' and then select 'Offline Mode'.

-
Click on ENABLE to enable Offline Mode.

-
The app will automatically sync and download the latest registration data to your device, storing it locally for offline access.
-
-
3. Checking In Attendees in Offline Mode
-
Sign in to the Eventleaf Check In app and select your event.
-
The app will display the check-in screen.

-
As attendees arrive, search for their names or scan their QR codes using the app.

-
When their registration info appears, click on CHECK IN.
-
A confirmation message appears that the check in has been successful.

-
The app records the check-in time and updates the attendee's status in the offline database stored on your device.
-
-
4. Checking Out Attendees in Offline Mode
-
Search for the attendee who is checking out.

-
Tap on CHECK OUT to check them out of the event.
-
The app records the check-out time and updates the attendee's status accordingly.
-
-
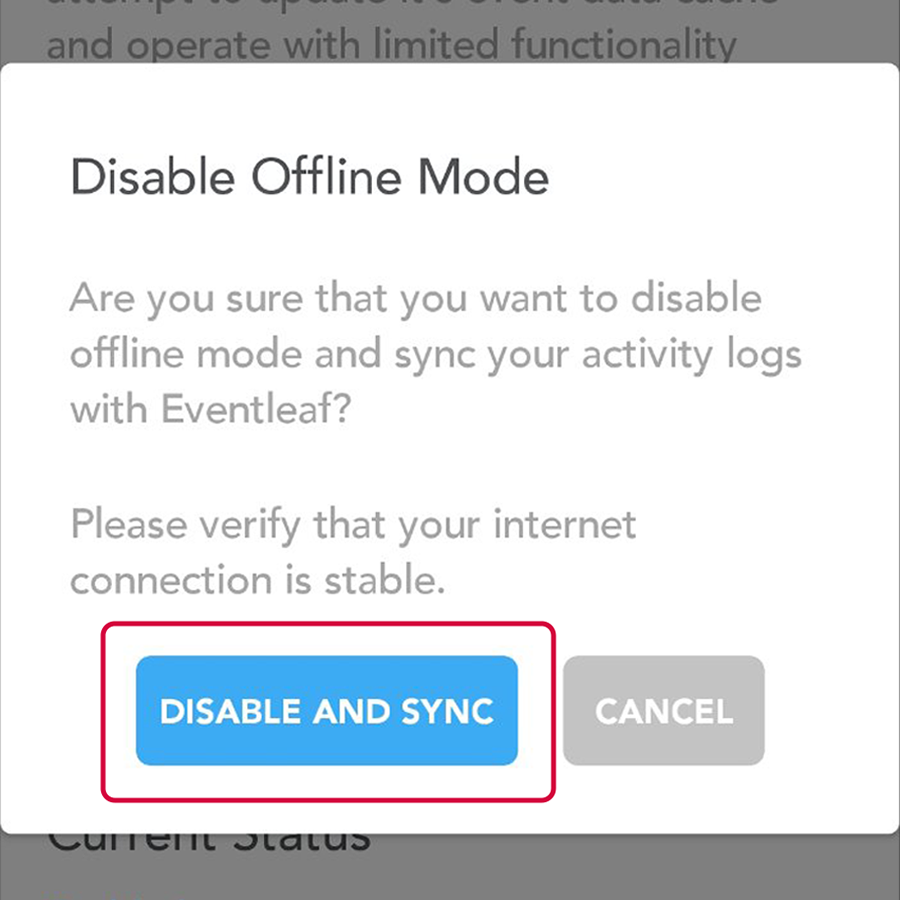
5. Syncing Offline Data Post-Event
-
Once internet access is available, go back into Settings and Usage Mode and select 'Offline Mode'.
-
Review the Offline actions to upload. If for some reason you decide not to upload the scans that were performed while in Offline Mode, select clear and verify the number of actions to clear.
-
To sync scans performed while in offline mode, select 'Disable and Sync'. On the verification pop up screen, review once more and then confirm by selecting 'Disable and Sync' again.
-
A confirmation will indicate that offline mode has been disabled and list the number of actions that were uploaded.
-
-
6. Reviewing and Reporting
-
After the sync, log in to Eventleaf.com and select your event.
-
Access the REPORTS dashboard to review the complete check-in and check-out data.

-
Generate reports or export data as needed for further analysis or record-keeping.
-
-
Related Guides